Table of Contents
New Pages and Posts
Using Blocks
Editing/Updating Pages and Posts
Adding Media to WordPress
Accessible Design
Academic Integrity
Wait! How did you do that?
New Pages and Posts
The first step to adding a new page or post is ensuring you are logged into your WordPress site. To login add /wp-login.php to the end of your url and click enter, for example: https://yoursite.trubox.ca/wp-login.php. Adding /wp-login.php takes you to the login screen, enter your credentials and click the Log In button, after click Log in you will be redirected to your sites dashboard. Please note that for security reasons we do not recommend clicking the Remember me checkbox, committing your credentials to memory is always best! If you forget your password click the Lost your password? link.

From your sites dashboard:
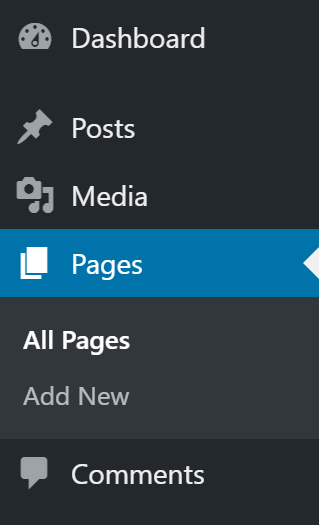
Adding a Page
To add a new Page, click the Pages menu option and then click the Add New link underneath or hover your cursor over the Pages menu option and click the Add new link in the fly-out menu.
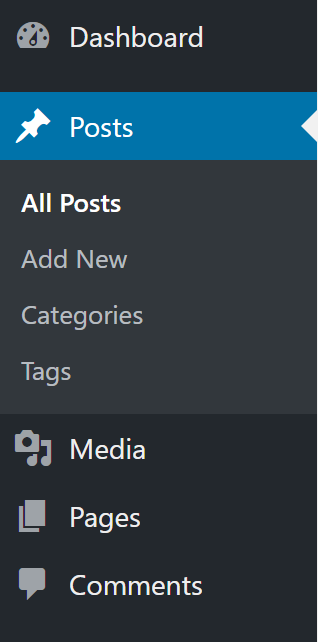
Adding a Post
To add a new Post, click the Posts menu option and then click the Add New link underneath or hover your cursor over the Posts menu option and click the Add new link in the fly-out menu.
And, of course, there’s another way for adding a page or a post! After you have clicked on either Pages or Posts you will notice an Add new button at the top on the right side of the Dashboard menu link. Our advice is to choose the method that feels most natural to you, in the end they all accomplish the same task.
Using Blocks
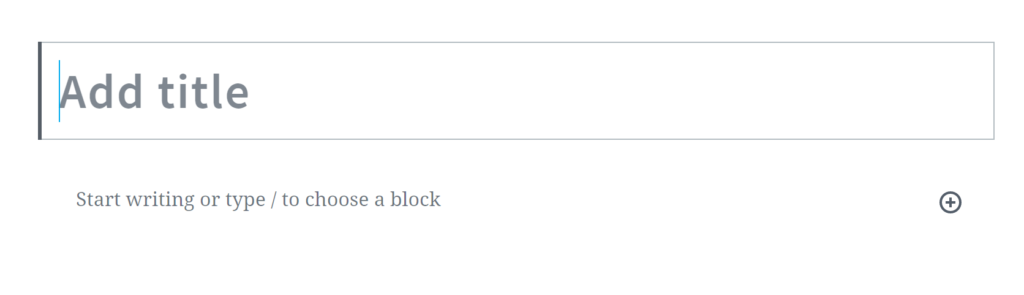
The first thing you want to do is give your page or post a title using the Add title field at the top of the editor, after that you can start adding content. If you are simply adding text you can start typing or copy and paste text into the Start writing or type / to choose a block field. To add columns, media, headings, quotes, buttons, or pretty much anything else you can think of click the Plus icon to select a Gutenberg block.
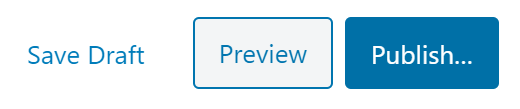
Note: You must click Save Draft or Publish…, located in the upper right, to save your new page or post! We recommend clicking Save Draft or Update often so you do not lose your work. (The Publish… button converts to Update)
Take a look at the upper left side of your screen, if you click the Plus icon a navigation pane that lists all of the Gutenberg blocks will appear. You may find it handy to keep this open so you can quickly select a block and keep on editing! While your up there check out the other options: the WordPress icon on the left side of the Plus icon takes you back to the Admin menu, the pencil icon offers you a tool selection, the left and right arrows allow you to undo and redo your most recent changes, the i icon shows you your pages content structure and the 3 lines shows displays block navigation.
WordPress.org has put together a set of instructions that outline how to use the editor, we believe these will save you time and frustration! Check them out at: https://wordpress.org/support/article/wordpress-editor/
Editing/Updating Pages, Posts and Portfolios
After you have added a new page or post you will likely want to go back and edit or update it. The first step is to login to your WordPress site (login instructions are above)
From your site’s dashboard:
Editing a Page
To edit a Page, click the Pages menu option and then click the All Pages link underneath or hover your cursor over the Pages menu option and click the All pages link in the fly-out menu.
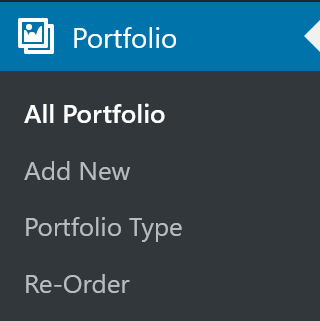
Editing a Post or Portfolio
To edit a Post, click the Posts or Portfolio menu option and then click the All Posts or All Portfolio link underneath or hover your cursor over the Posts or Portfolio menu option and click the All Posts or All Portfolio link in the fly-out menu.
Now you should see a list of all your pages or posts, hover over the page you want to edit and click Edit from the menu that appears below the page’s or post’s title. You will be taken to the page or post in edit mode so you can make the necessary updates.
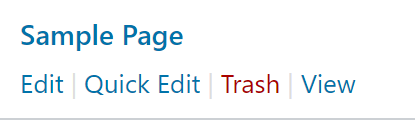
Let’s take a minute to go over this menu, Edit takes you to edit mode, Trash deletes the page, View let’s you view the page, Quick Edit let’s you do some cool stuff! Let’s take a look at the Quick Edit menu for pages and posts.

The image above is displaying the quick edit menu for a page. Here you can change the title and slug (the slug is what displays in the URL, e.g. https://www.yoursitetitle/sample-page). You can change the date the page was created on, password protect the page or make it private, allow comments, revert it to draft or publish it. You can assign it a template, you can create your own template but we will stick to the default or use one that comes with the sites theme. You can also assign the page as a parent page (consider your site’s navigation here as this will drive your breadcrumb trail).
When you are in edit mode of a page or post you will notice these options are available to you on the right side of your screen. If they are not, you are seeing the properties of the block you are editing. Click on Document to show the pages properties. Again, while you are checking out the right side of your screen, look at the options available to you for each block you’ve added. Play with them, have some fun, see what you can do!

The image above is displaying the quick edit menu for a post. It has all the same options as a page and it also has a few additional features. Here you can change the post’s category and add tags. For help with creating categories go to https://wordpress.com/support/posts/categories/. To learn more about the differences between categories and tags check out https://wordpress.com/support/posts/categories-vs-tags/. Finally, you will find some good tagging tips at https://wordpress.com/support/posts/categories-vs-tags/tagging-tips/.
There’s one more option for getting to edit mode, but you need to be logged in for this menu to display. If the page or post is published and showing on your site then you can navigate to the page or post and click the Edit Page (Edit Post) link that is located in the menu bar at the top of your screen.

We recommend hovering over all the menu links to familiarize yourself with them. You’ll notice when you hover over + New that you can add a new page or post as well as upload media. WordPress provides many ways to do the same task and the best way is the one you like!
Adding Media to WordPress
Using different types of media to represent your artifacts is a great way to make your ePortfolio dynamic and keep your audience engaged. Text-heavy pages can get cumbersome regardless of how you arrange it. Media can help with breaking up content or replacing text all together. Consider how you can “show what you know” rather than just simply telling. Media can also be an alternative to simply hyperlinking all your artifacts. Instead of sending your audience off to another site or tab, media can be embedded to keep your audience contained to your page. Some options can include:
Photos or Videos
You do not need to create everything from scratch. There are many sources that provide professional-looking, royalty-free images and video.
- Unsplash https://unsplash.com/
- Pexels https://www.pexels.com/
- Wikimedia Commons https://commons.wikimedia.org/wiki/Main_Page
When it comes to creating videos, there is a lot you can do with your smartphone’s camera. If you need to record your screen, but don’t have screen capturing software, then consider using a web-conferencing tool (like Zoom), and record your screen share. As for screen capturing tools, there are many freemium web-based ones or Chrome extensions that are very user-friendly. Just do a Google search and find one that works for you.
Infographics
If you are looking to create something visual, but still informative, infographics can do just that. Here are a few free (or freemium) web-based graphic design tools that are very user-friendly:
- Canva http://www.canva.com
- Pikochart https://piktochart.com
Podcasts
Maybe some of your work might have more impact spoken or heard. Whatever the reason, don’t rule out audio as a form of media. To record, you can use the voice memo app on a smartphone and upload the mp3 file directly to WordPress. Alternatively, you can use a web tool like Soundcloud https://soundcloud.com/ to record, edit and save. Soundcloud easily embeds into WordPress by simply copying and pasting the URL on to your page/post.
Embedding PDFs
Since papers are common items to artifact, embedding PDFs right into your website is a good option in comparison to linking them, which requires the audience to either open it in a new tab or download it. We have the PDF Embedder plugin which you can use. To activate the plugin, from your dashboard click the Plugins link. Next, search for pdf in the Search for installed plugins… text box and finally click Activate for the PDF Embedder plugin. The PDF Embedder block will now be added to the Blocks list when you click the Plus icon.
H5P
We have a whole section on H5P.
Uploading Media
In order for any media to display on your site, it needs to be uploaded. The first step is to ensure that your media is downloaded to the computer or device you are are using to update your site with. If your media is stored on an external hard drive make sure it is plugged in!
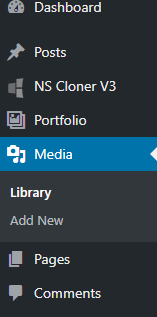
Next, to upload your media via the Media link on your dashboard, click the Media menu option and then click the Add new link underneath, or hover your cursor over the Media menu option and click the Add new link in the fly-out menu.
To add your media to a page or post, go to edit mode for that page or post (see Editing/Updating Pages and Posts). When you select the image, audio, video, cover, or gallery blocks you will be presented with the option to upload media (add new media as described above) or to select media that has already been uploaded to you media library. Click Upload if the media has not been added to the Media library and click Media Library (learn more about the Media Library at: https://wordpress.org/support/article/media-library-screen/) if the media has already been uploaded. The image, video and audio blocks give you a third option Insert from URL. Be careful with this one, it is not what it seems. Here is an example of a URL that will display an image: https://www.tru.ca/__shared/assets/Logos-01_-TRU_Logo_Left_900px37269.png. Essentially, the insert by URL lets you hotlink to an image. Below is an image of the video block.

Accessible Design
Accessibility is important. Designing with the audience experience in mind will make your site more user friendly and inclusive for more visitors. When you think about accessibility, think beyond people using assistive technologies such as screen readers. Also think about mobile users and search engine robots. Most WordPress themes have taken accessibility into consideration when designing the theme, so you do not have to much to worry about. Below is a list tips that outline the design choices you are in full control of:
- Headings
Headings are important as they allow search engines to index the content and structure of your web pages and they allow your visitors to skim your pages. Headings are defined as H1, H2, H3, H4, H5, H6. Heading 1 (H1) should be used for the pages main heading, followed by heading 2 (H2), heading 3 (H3) are less important, and so on. - Alternative text
Whenever you add an image, always fill in the Alt text (alternative text) field with a description the object. If you do not fill in the Alt text field, your images will be inaccessible to visitor using screen readers. - Use clear language
You should always use clear language that is easy to understand. You can accomplish this by keeping your sentences short, avoid using dashes (write H1 to H6 rather than H1-H6), use whole words (write January rather than Jan), and finally avoid slang. - Writing good links
Your links should be descriptive so that visitors know what information they will get by clicking on the link. Avoid hyperlinking text that simply reads “click here,” “read more,” or “here.” - Contrasting colors
Using contrasting colors makes reading text easier on the eyes. This is why the default is black text on white background. Use color to draw attention to a specific point or idea. Color, especially in background, can be used to set the mood, but be careful the intensity. The brighter it is, the more attention it may draw and the harder it can be to read. Consider what you want your audience to focus on: your content or your background?
These high level guidelines will help to make sure your site is user friendly. However, there are many more, for example, providing transcripts for audio and ensuring your site is fully functional from a keyboard. Check out the sites listed below to learn more about accessibility:
- W3C – Accessibility Fundamentals Overview
- WordPress.org – Accessibility Handbook
- Mediacurrent – Manual Accessibility Testing: Why & How
Finally, if you are keen to know how accessible your web pages are you can run them through Wave’s Web Accessibility Evaluation Tool at: https://wave.webaim.org/
Academic Integrity
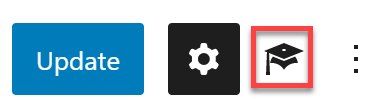
Copying and pasting is a very convenient method of transferring information, but it is imperative that you do not forget to cite your sources. Your audience will assume that the content on your site is yours unless you explicitly specify otherwise, and if they are not all your words or ideas originally, you are plagiarizing. WordPress has a helpful citation manager plugin that can help you with referencing. We have activated the Academic Blogger’s Toolkit for you. You can access the Academic Blogger’s Toolkit by clicking the Graduation Cap icon in the upper right corner of your screen.
It is super easy to use especially if you have a DOI to the article. All you need to do is enter the DOI and the plugin fill in the fields. You can even import references from other citation managers such as Zotero. There are a few little annoying things to take note of, such as you cannot edit the inline citations, if you use a direct quote you need to cite it manually and you need to add a citation to the article before it will show on the References list. Other than that we really like it. For instructions on how to use the plugin we recommend going to the plugins documentation wiki at: https://github.com/dsifford/academic-bloggers-toolkit/wiki. To review some custom instructions check out: https://trubox.ca/plugin-academic-bloggers-toolkit/.
Wait! How did you do that?
Formatting Lists
When we want to add text below a bullet without adding a new bullet, you will notice that if you hit the enter key then the backspace key, you only to get frustrated that you are back on the line you just left! Here is a handy tip: click Shift+Enter to start a new line without adding a bullet, and when your ready for another line with a bullet click Enter (as normal).
- This is my first bullet (click Shift+Enter)
this is my line of text without a bullet (click Enter) - This is my second bullet
Page Jumping
You may be wondering how we were able to create links that jumped up or down the page from the table of contents at the top. This is called page jumping and it is great way to link your visitors from one part of content to another and is especially handy for long pages such as this one. To add a page jump click on the heading you want to jump to and add a HTML Anchor in the Advanced field. Now you can link some text to your anchor, highlight some text or add an image and select the link option from the block’s toolbar and type in # immediately before the HTML Anchor. Note that anchor links do not work in preview mode or draft mode but they will work once the page or post is published! For detailed instructions regarding page jumps go to: https://wordpress.org/support/article/page-jumps/.
Paragraphs
Click Enter to quickly start a new paragraph. This may seem like a silly set of instructions but it is something we have to think about when editing using Gutenberg blocks.
We recommend you delete this text and add your own. If you want to keep a version of this, you can clone it and then save the duplicate as a draft.